Butter Swim Biscuits: Melt-in-Your-Mouth Southern Comfort
Table of Contents
Did you know that the average American consumes approximately 6.3 pounds of butter per year, yet most have never experienced the transcendent delight of Butter Swim Biscuits? These incredibly rich, tender biscuits have taken social media by storm, garnering over 50 million views on TikTok alone. What makes Butter Swim Biscuits so irresistible isn’t just their decadent buttery flavor – it’s the revolutionary technique that flips traditional biscuit-making on its head. Unlike conventional biscuits that incorporate cold butter into the dough, Butter Swim Biscuits literally swim in melted butter before baking, resulting in a golden, crispy exterior and a uniquely tender interior that practically melts in your mouth.
This southern-inspired comfort food staple has been perfected over generations, though many home cooks still struggle with achieving that perfect texture. Whether you’re a seasoned baker or a novice in the kitchen, this comprehensive guide will walk you through creating the most delectable Butter Swim Biscuits you’ve ever tasted.
Why You’ll Love This Recipe
These Butter Swim Biscuits are the epitome of rich, buttery comfort food with a perfectly balanced flavor profile that’s simultaneously savory and subtly sweet. The beauty of this recipe lies in its simplicity – it requires just six basic ingredients that you likely already have in your pantry. Even better, the entire preparation process takes less than 10 minutes before popping them in the oven.
Unlike traditional biscuit recipes that require careful handling and folding techniques, this foolproof method eliminates the common pitfalls of biscuit-making. There’s no need to worry about overworking the dough or achieving the perfect temperature – these biscuits are virtually impossible to mess up!
Perfect for weekend breakfasts, holiday brunches, or as a side dish to complement hearty soups and stews, these versatile biscuits can be easily adapted to your preferences. While they shine in their classic form, you can effortlessly customize them with additions like herbs, cheese, or even sweet variations.
What truly sets these Butter Swim Biscuits apart is their irresistible texture contrast – a crispy, golden exterior giving way to layers of tender, pillowy softness inside. Each bite delivers that nostalgic, homemade quality that store-bought alternatives simply cannot match.
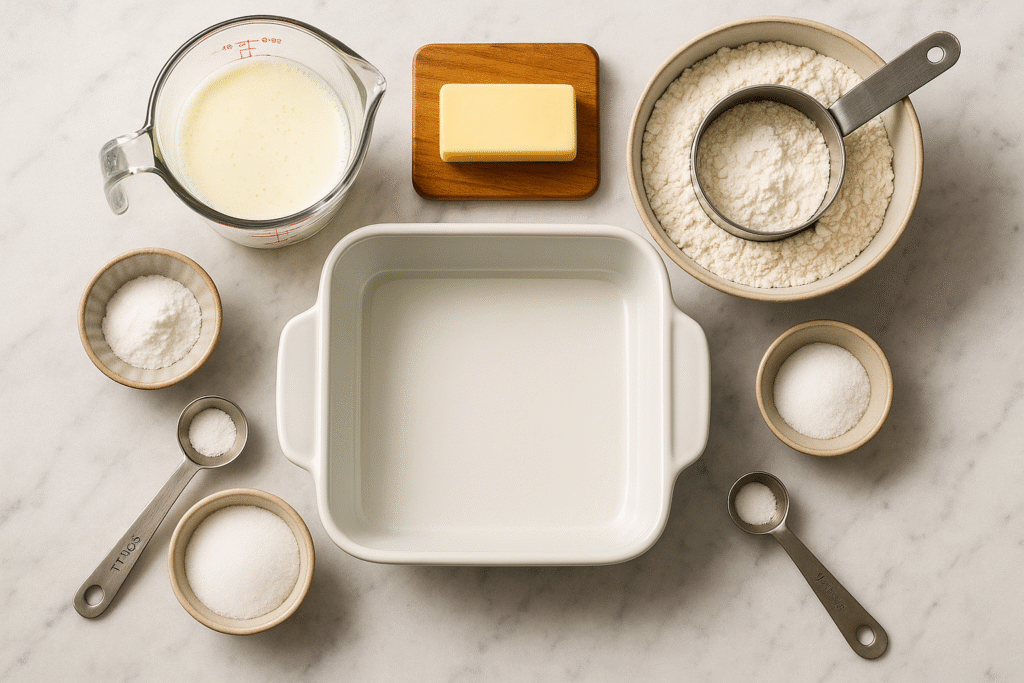
Ingredients You’ll Need
To create these heavenly Butter Swim Biscuits, gather these simple yet transformative ingredients:
- 2½ cups all-purpose flour – The backbone of our biscuits, providing structure while remaining tender. For a lighter texture, you can substitute up to half with cake flour.
- 2 cups buttermilk – This tangy liquid creates the perfect reaction with the leavening agents for tall, fluffy biscuits. No buttermilk on hand? Mix 2 tablespoons of white vinegar or lemon juice with enough regular milk to make 2 cups and let stand for 5 minutes.
- ½ cup (1 stick) salted butter – The star ingredient that creates that distinctive crispy exterior and rich flavor. If using unsalted butter, add an extra ¼ teaspoon of salt to the dry ingredients.
- 4 teaspoons baking powder – Provides the signature rise that makes these biscuits irresistibly fluffy. Make sure yours is fresh for optimal results.
- 4 tablespoons granulated sugar – Adds a subtle sweetness that balances the savory butter notes. You can reduce to 2 tablespoons for a less sweet version.
- 1 teaspoon salt – Enhances all the flavors and creates the perfect savory foundation.
The magic of Butter Swim Biscuits lies not just in the ingredients themselves, but in how they interact through this unique preparation method. Each component plays a crucial role in developing the signature texture and flavor that makes these biscuits so special.
Step-by-Step Instructions
Step 1: Prepare Your Oven and Baking Dish
Preheat your oven to 450°F (232°C) to ensure it reaches the optimal temperature for creating that perfect golden crust. While conventional wisdom might suggest lower temperatures for baking, the high heat is crucial for the transformation of these biscuits.
Select an 8×8 inch square baking dish or a 9-inch round cake pan. The size matters here – too large, and your biscuits will spread too thin; too small, and they may not cook through properly. Place the stick of butter in your chosen baking dish and put it in the preheating oven until completely melted, about 3-4 minutes. Watch carefully to prevent browning – we want melted butter, not browned butter for this recipe.
Step 2: Mix Your Dry Ingredients
While your butter melts, whisk together the flour, baking powder, sugar, and salt in a medium bowl. The thorough mixing of these dry ingredients ensures even distribution of the leavening agents, which is critical for uniform rising. Don’t rush this step – a good 30 seconds of whisking will incorporate air and ensure no pockets of salt or baking powder remain.
Remember that over-mixing once the wet ingredients are added can lead to tough biscuits, but at this dry stage, thorough mixing is your friend. This is also the perfect time to add any dry herbs or seasonings if you’re creating a savory variation.
Step 3: Add the Buttermilk
Create a well in the center of your dry ingredients and pour in the buttermilk. Using a wooden spoon or rubber spatula, gently stir until just combined. The key word here is “gently” – you’ll notice the mixture will be very wet and sticky, much more so than traditional biscuit dough. This unusual consistency is exactly what you want!
Stop mixing as soon as no dry flour remains visible. The dough will look shaggy and quite wet – resist the urge to add more flour or to overmix. Those little lumps and the wet texture are the secret to achieving that perfect tender crumb.
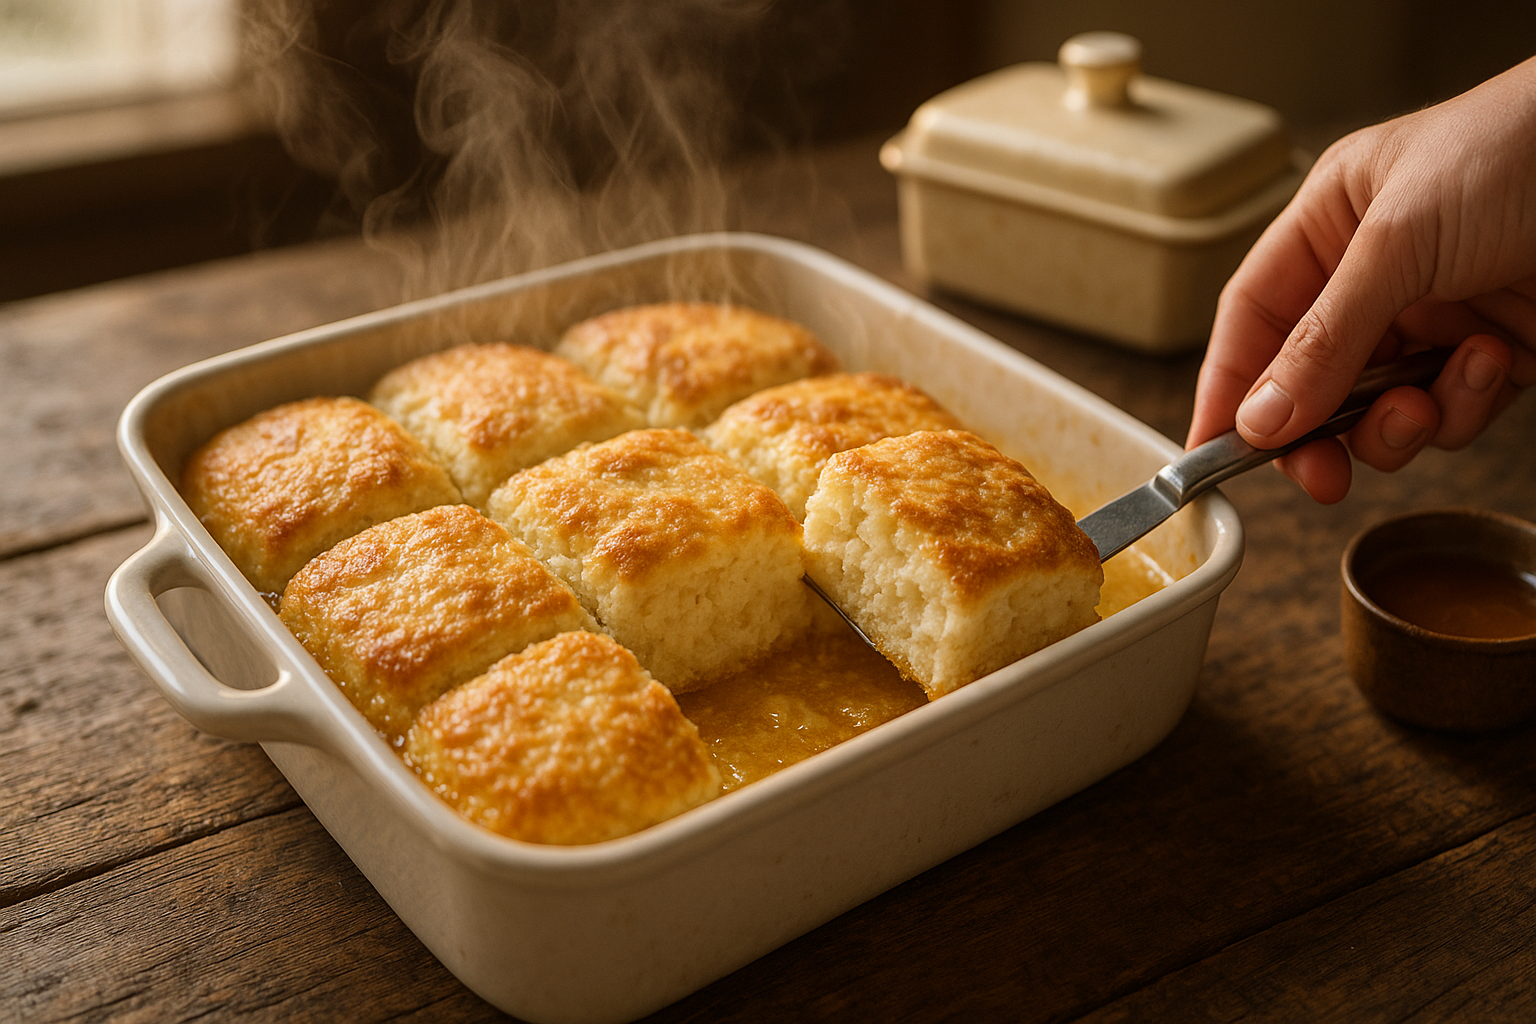
Step 4: Transfer to the Butter Bath
By now, your butter should be completely melted in the baking dish. Remove it carefully from the oven. Working quickly but gently, transfer your wet biscuit dough to the butter-filled baking dish. Instead of stirring the butter into the dough, simply use your spatula to roughly spread the dough evenly across the dish.
The butter will naturally rise up and around the edges of the dough – this is the “swimming” part that gives these biscuits their name! This technique allows the butter to create that incredible crispy exterior while keeping the interior supremely tender.
Step 5: Score the Dough
Before baking, use a knife to score the dough into 9 equal squares (or 12 if you prefer smaller portions). This step is crucial as it makes separation after baking much easier and creates natural breaking points that help the biscuits rise evenly.
Make sure your cuts go all the way through the dough but don’t scratch your baking dish. The precision of your cutting isn’t critical – these are rustic, homestyle biscuits after all!
Step 6: Bake to Golden Perfection
Place your butter-swimming biscuit dough in the preheated oven and bake for 20-25 minutes, or until the top is beautifully golden brown. The high temperature creates that irresistible contrast between crisp exterior and fluffy interior.
The biscuits will rise dramatically during baking – don’t be surprised if they nearly double in height! You might notice the butter bubbling around the edges, which is exactly what should happen as it works its magic on the exterior of your biscuits.
Step 7: Cool Slightly Before Serving
Remove the baked biscuits from the oven and allow them to cool in the pan for about 5 minutes. This brief resting period allows the structure to set, making them easier to separate while still serving them deliciously warm.
The biscuits will have absorbed most of the butter, but there might still be some in the bottom of the pan – this is liquid gold! You can drizzle this over the biscuits when serving for an extra buttery finish.
Serving Suggestions
Butter Swim Biscuits shine in their versatility, complementing both sweet and savory dishes with equal brilliance. For a classic breakfast experience, split a warm biscuit and drizzle with honey or spread with your favorite jam – the contrast between the sweet topping and the buttery, slightly salty biscuit creates a perfect harmony of flavors.
For a more indulgent breakfast option, use these biscuits as the foundation for unforgettable breakfast sandwiches. Layer with a fried egg, crispy bacon, and a slice of sharp cheddar for a handheld breakfast that will fuel your entire morning.
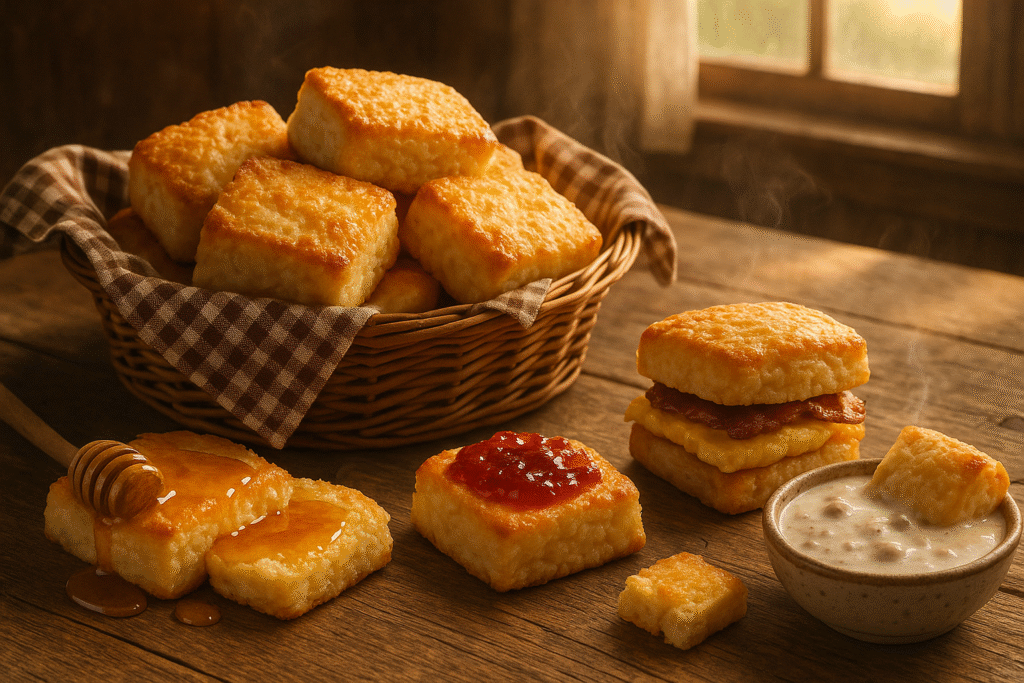
During the cooler months, these biscuits are the ideal companion to hearty soups and stews. Their sturdy yet tender structure makes them perfect for sopping up flavorful broths, while the buttery notes enhance rather than compete with complex soup flavors.
For a Southern-inspired dinner, serve alongside fried chicken and collard greens. The biscuits will happily soak up any savory juices while providing a satisfying contrast in texture.
Looking for a crowd-pleasing party option? Create a biscuit bar with a variety of toppings – from savory options like country gravy, herb butter, and chive cream cheese to sweet selections including honey butter, apple butter, and various preserves. Your guests will delight in creating their own perfect combinations.
Storing Instructions
Butter Swim Biscuits are at their absolute peak when served fresh from the oven, but proper storage can help maintain their quality if you have leftovers or want to prepare in advance.
For same-day storage, allow the biscuits to cool completely, then place them in an airtight container lined with paper towels. Store at room temperature for up to 12 hours. The paper towels help absorb excess moisture that might otherwise make the biscuits soggy.
If you need to store them longer, refrigeration is your best option. Place cooled biscuits in an airtight container and refrigerate for up to 3 days. To revive refrigerated biscuits, wrap individually in aluminum foil and heat in a 350°F oven for about 5-7 minutes, or until warmed through.
For longer-term storage, these biscuits freeze beautifully. Wrap each cooled biscuit individually in plastic wrap, then place in a freezer-safe bag or container. They’ll maintain quality for up to 3 months. To reheat from frozen, unwrap and place on a baking sheet in a 350°F oven for 10-15 minutes until heated through.
For make-ahead convenience, you can prepare the dry ingredients mixture in advance and store it in an airtight container for up to 3 months. When ready to bake, simply proceed with adding the buttermilk and following the remaining steps. This time-saving trick is especially handy during busy holiday seasons.
Conclusion
Butter Swim Biscuits represent the beautiful intersection of simplicity and indulgence – a testament to how a handful of humble ingredients can transform into something truly extraordinary. By employing this unique “swimming” technique, you bypass the common pitfalls of traditional biscuit-making while achieving results that would make any Southern grandmother proud.
What makes these biscuits truly special isn’t just their incredible flavor and texture, but their accessibility to bakers of all skill levels. From kitchen novices to seasoned pros, anyone can achieve spectacular results with this forgiving and rewarding recipe.
Whether you’re serving them alongside a hearty soup, offering them as part of a special breakfast, or simply enjoying one warm from the oven with a smear of jam, these Butter Swim Biscuits deliver comfort and satisfaction in every bite. Their versatility makes them an essential addition to your cooking repertoire – one you’ll find yourself returning to time and again.
I encourage you to try this recipe and experience the magic for yourself. Share your results in the comments section below – I’d love to hear how these biscuits become part of your family traditions. And don’t forget to subscribe for more recipes that transform simple ingredients into extraordinary culinary experiences!
Butter Swim Biscuits
Ingredients
Method
- Preheat your oven to 450°F (232°C).
- Place the stick of butter in an 8×8 inch square baking dish or 9-inch round cake pan and put it in the preheating oven until completely melted, about 3-4 minutes.
- While butter melts, whisk together the flour, baking powder, sugar, and salt in a medium bowl.
- Create a well in the center of your dry ingredients and pour in the buttermilk. Using a wooden spoon or rubber spatula, gently stir until just combined.
- Remove the baking dish with melted butter from the oven. Transfer your wet biscuit dough to the butter-filled baking dish and spread evenly.
- Use a knife to score the dough into 9 equal squares.
- Bake for 20-25 minutes, or until the top is beautifully golden brown.
- Remove from oven and allow to cool in the pan for about 5 minutes before serving.
Notes
FAQs
Can I use regular milk instead of buttermilk?
While buttermilk provides the ideal tangy flavor and reacts perfectly with the baking powder, you can substitute regular milk in a pinch. For best results, create a homemade buttermilk by adding 2 tablespoons of white vinegar or lemon juice to 2 cups of milk, then let it stand for 5 minutes before using. This acidification helps activate the baking powder for proper rising.
Why are my biscuits not rising as much as expected?
Three common culprits affect rise: outdated baking powder, overmixing the dough, or an oven that hasn’t fully preheated. Check that your baking powder is fresh (replace every 6 months), mix only until ingredients are just combined, and ensure your oven has reached the full 450°F before baking. Also, be sure you’re using an 8×8 or 9-inch round pan – larger pans will result in flatter biscuits.
Can I add cheese or herbs to this recipe?
Absolutely! These biscuits are wonderfully adaptable. For a savory twist, fold in 1/2 cup of shredded cheddar, Gruyère, or Parmesan cheese after mixing the wet and dry ingredients. For herbs, add 1-2 tablespoons of fresh chopped herbs (rosemary, thyme, chives) or 1-2 teaspoons of dried herbs to the dry ingredients before mixing. Garlic powder (1/2 teaspoon) makes another delicious addition.
Is it possible to make these biscuits ahead of time?
Yes! Prepare the dough and place it in the butter-filled baking dish, then cover with plastic wrap and refrigerate for up to 24 hours before baking. When ready to bake, remove from the refrigerator, let stand at room temperature for 20 minutes, then bake as directed. You may need to add 2-3 extra minutes to the baking time if starting with cold dough.
My biscuits seem too wet in the middle. What went wrong?
The uniquely moist texture of Butter Swim Biscuits can sometimes be mistaken for underbaking. However, if they’re truly underbaked, the issue is usually one of three things: your oven temperature may be running low (consider using an oven thermometer to verify), you might need to bake them a few minutes longer until deeply golden on top, or your baking dish might be too small, making the center too thick to cook through properly.
Can I reduce the amount of butter to make these healthier?
While the generous amount of butter is what gives these biscuits their signature flavor and texture, you can reduce the butter to 6 tablespoons instead of 8 (3/4 stick instead of a full stick) with acceptable results. The exterior won’t be quite as crispy, but they’ll still be delicious. I wouldn’t recommend reducing further than this, as it fundamentally changes the character of the recipe.
Are these biscuits suitable for sweet or savory applications?
These versatile biscuits work beautifully in both sweet and savory contexts. The recipe as written includes a touch of sugar that complements both applications. If you plan to use them exclusively for savory dishes, you can reduce the sugar to 2 tablespoons. For predominantly sweet applications, consider adding 1/2 teaspoon of vanilla extract to the buttermilk or a teaspoon of cinnamon to the dry ingredients.