The Best Cheesy Beef Enchiladas Tortellini with 6 Toppings
Table of Contents
Here’s a question backed by some fascinating data: If you had to pick just one type of international cuisine to eat for the rest of your life, what would it be? If you’re like most Americans, your answer is likely either Italian or Mexican. A recent CivicScience poll revealed that these two culinary powerhouses are neck-and-neck as the nation’s favorites, with 35% of U.S. adults choosing Italian and a very close 33% picking Mexican.
Now, what if you didn’t have to choose? What if you could combine the rich, savory, cheese-laden comfort of an Italian pasta bake with the bold, zesty, and satisfying flavors of Mexican enchiladas? This is where the magic of “third-culture cuisine”—a modern, creative take on fusion food—comes into play, a trend driven by adventurous palates and the desire for novel flavor experiences.2 With over half of Americans trying new recipes they discover on social media, the stage is set for a new weeknight champion. Prepare to meet your new family-favorite obsession:
Cheesy Beef Enchiladas Tortellini. This one-pan wonder is the delicious answer you’ve been searching for, perfectly blending two beloved food worlds into one unforgettable meal.
Why You’ll Love This Cheesy Beef Enchilada Tortellini
This isn’t just another casserole; it’s a game-changing weeknight dinner that will have everyone asking for seconds. Here’s exactly why this recipe will earn a permanent spot in your meal rotation:
- A Fusion of Favorite Flavors: It masterfully combines the rich and savory notes of a beefy enchilada with the hearty, cheesy satisfaction of a tortellini bake. It’s the best of both worlds in every single bite.
- Incredibly Quick and Easy: This is a true “one-pan wonder”. From browning the beef to melting the cheese, everything happens in a single skillet, which means minimal cleanup. It’s on the table in about 30 minutes, making it a weeknight winner.
- Pantry and Freezer Staples: No need for a special grocery run. This recipe transforms basic, easy-to-find ingredients like ground beef, canned enchilada sauce, and frozen tortellini into something totally crave-worthy.
- Completely Customizable: This recipe is a canvas for your creativity. You can easily swap the ground beef for turkey or Italian sausage, use red or green enchilada sauce, adjust the spice level, or mix up the cheeses to suit your family’s tastes.
- Perfect for Any Occasion: It’s the ideal meal for a busy weeknight, a cozy family dinner, or even to feed a crowd. Plus, it’s fantastic for meal prep, as the leftovers are just as delicious the next day.
- Family- and Picky-Eater-Approved: The familiar flavors of pasta and cheesy beef make this dish an instant hit with both kids and adults. It’s a comforting, protein-rich meal that delivers maximum flavor with minimum fuss.
Ingredients You’ll Need
This recipe comes together with a handful of simple yet powerful ingredients. We’ve organized them for clarity and included some pro tips to ensure your dish is a spectacular success.
- For the Savory Beef Base:
- Lean Ground Beef: One pound of 80/20 or 90/10 lean ground beef provides the perfect savory, hearty foundation. You can substitute ground turkey or even ground Italian sausage if you prefer.
- Yellow Onion & Fresh Garlic: One small yellow onion and two cloves of fresh garlic create the aromatic backbone of the dish. Fresh garlic is highly recommended over jarred for its superior, pungent flavor.
- Olive Oil: Just a tablespoon for sautéing the aromatics.
- The Enchilada Spice Cabinet:
- Chili Powder, Cumin, and Paprika: This classic trio delivers that unmistakable enchilada flavor.
- Dried Oregano, Salt, and Black Pepper: Essential seasonings to round out the flavor profile.
- Shortcut Tip: In a hurry? You can substitute the individual spices with one packet of your favorite taco seasoning.
- The Sauce and More:
- Red Enchilada Sauce: One 10-ounce can of mild red enchilada sauce. You can use green enchilada sauce for a tangier flavor profile.
- Diced Tomatoes with Green Chiles: One 10-ounce can of Ro-Tel (or a similar brand) adds a little kick of heat and wonderful texture. Don’t drain it!.
- The Pasta and Cheese:
- Cheese-Filled Tortellini: This is the star of our Italian-Mexican fusion! You’ll need about a 19-ounce package. Your choice of tortellini is the first major decision that impacts the recipe.
- For Ultimate Convenience (Our Recommendation): Use Frozen Tortellini. It can be added directly to the skillet and cooked in the sauce, making this a true one-pan meal.
- For the Fastest Cook Time: Use Refrigerated (Fresh) Tortellini. This type cooks in just a few minutes but should be added near the end to prevent it from getting mushy.
- If You Only Have Dried Tortellini: You must cook it separately in boiling water according to package directions before adding it to the skillet. Using dried tortellini without pre-cooking will result in hard pasta, as there isn’t enough liquid in the skillet sauce to cook it from scratch.
- Shredded Cheese Blend: A combination of Monterey Jack and Cheddar cheese provides the perfect balance of creamy meltiness and sharp flavor. For the absolute best, gooiest, most picture-perfect cheese pull, grate your own cheese from a block. Pre-shredded cheeses contain anti-caking powders like cellulose or potato starch that can prevent them from melting as smoothly. Monterey Jack, Cheddar, Colby, and Fontina are all fantastic melting cheeses for casseroles.

Step 1: Brown the Beef & Build Your Flavor Base
First things first, let’s build that deep, savory flavor that will make this dish unforgettable. Heat a large, oven-safe skillet (at least 12 inches) over medium-high heat. Once the pan is hot, add the ground beef and chopped onion. A hot pan is key; it helps the beef brown properly instead of just steaming. Use a wooden spoon to break the beef into smaller crumbles as it cooks.
Let the meat sit for a minute or two between stirs to allow a nice brown crust to form—this process, known as the Maillard reaction, is where incredible flavor is developed. Cook for about 5-7 minutes, until the beef is no longer pink and the onion has softened. Drain off any excess grease.
Pro-Tip: Never pour hot grease down your kitchen sink, as it can solidify and cause serious plumbing issues. The safest method is to carefully soak it up with a few paper towels held by tongs and then discard them in the trash.
Step 2: Awaken the Spices & Add Aromatics
With the beef browned, it’s time to layer in more flavor. Add the minced garlic to the skillet and cook for about 30-60 seconds, stirring constantly, until it becomes wonderfully fragrant. Be careful not to let it burn. Now, add your dry seasonings: the chili powder, cumin, paprika, oregano, salt, and pepper. Stir them into the beef and continue cooking for another minute.
This step, known as “blooming” or “toasting” the spices, is a professional trick that uses the heat and residual fat in the pan to unlock the spices’ essential oils, making their flavor much more intense and aromatic than if you were to simply stir them into a liquid. Your kitchen should start smelling amazing right about now!
Step 3: Get Saucy – Create the Enchilada Gravy
Now it’s time to turn that seasoned beef into a luscious, saucy base. Pour the entire can of red enchilada sauce and the undrained can of diced tomatoes with green chiles (Ro-Tel) directly into the skillet. Stir everything together, scraping up any browned bits from the bottom of the pan (that’s pure flavor!). Bring the mixture to a lively simmer and let it bubble gently for a few minutes. This allows all the individual flavors from the beef, spices, and sauces to meld together into a single, cohesive, and incredibly rich enchilada-style gravy.
Step 4: The Tortellini Tumble
Here comes the fusion! Add the entire package of frozen cheese tortellini directly into the simmering sauce. Give everything a gentle stir to make sure the tortellini are submerged and coated in the sauce. Bring the mixture back to a simmer, then reduce the heat to medium-low, cover the skillet with a lid, and let it cook for 5-7 minutes, or according to the package directions for al dente pasta.
It’s a good idea to stir once halfway through to prevent any tortellini from sticking to the bottom of the pan. Be careful not to overcook the pasta at this stage; it will continue to soften as it sits in the hot sauce, and you want to avoid a mushy texture.
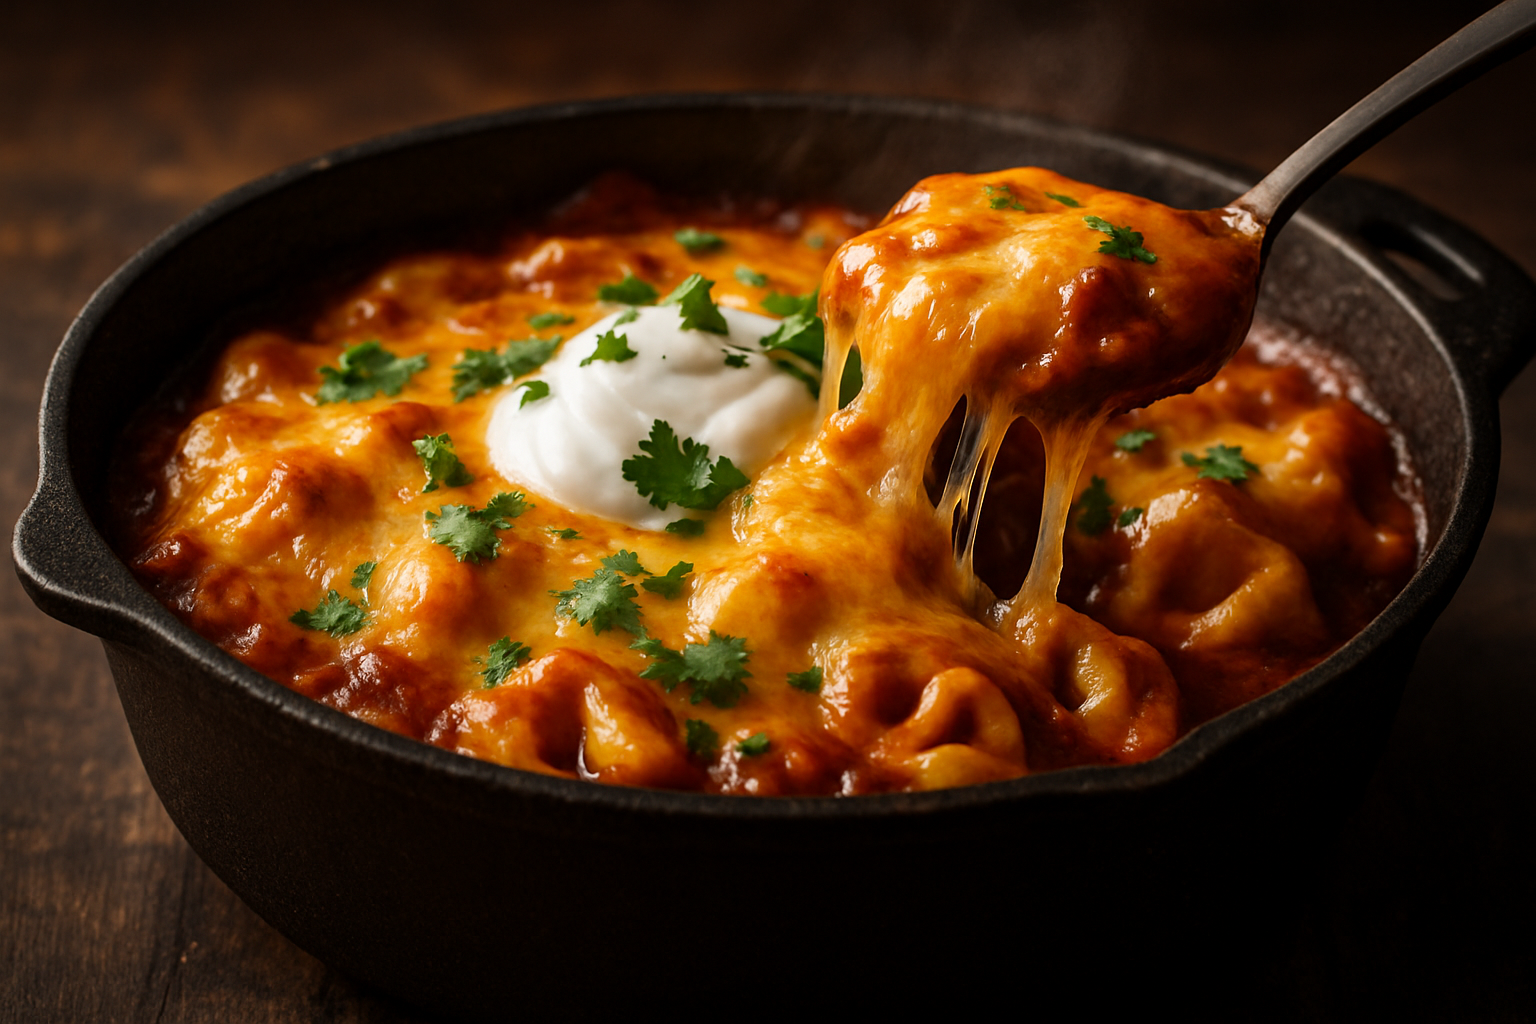
Step 5: The Grand Finale – The Cheesy Blanket
Once the tortellini is perfectly tender, turn off the heat. Now for the best part: the cheese. Sprinkle your freshly shredded Monterey Jack and Cheddar cheese blend evenly over the entire surface of the skillet. From here, you have two fantastic options for the final melt:
- For a Quick, Creamy Melt: Simply place the lid back on the skillet for 2-3 minutes. The residual heat will melt the cheese into a perfectly gooey, creamy layer.
- For a Bubbly, Golden-Brown Top (Recommended): If your skillet is oven-safe, place it under your oven’s broiler for 1-3 minutes. Watch it like a hawk! The cheese will bubble and turn a beautiful golden brown, adding a slightly crispy texture that’s absolutely irresistible. This method gives you that classic baked-casserole finish.
Serving Suggestions
While this Cheesy Beef Enchilada Tortellini is a complete meal in itself, the right side dish can elevate it from a great dinner to an extraordinary one. The key is balance. Since the casserole is rich, cheesy, and savory, you’ll want to pair it with something that offers a contrasting element of freshness, acidity, or a lighter texture.
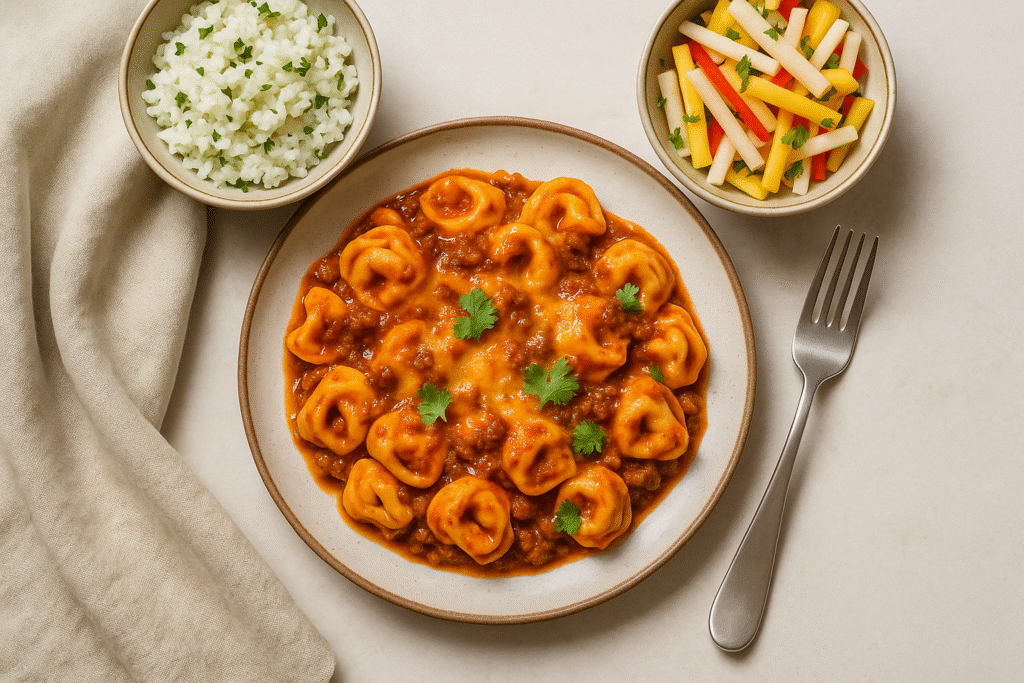
- For a Cool, Crisp Crunch: A vibrant Jicama and Mango Salad tossed in a lime vinaigrette provides a sweet and tangy counterpoint that cuts through the richness beautifully. Another fantastic option is a simple
Lemony Cabbage-Avocado Slaw, which has a creamy-crisp texture reminiscent of guacamole. - For a Classic Companion: You can’t go wrong with rice to soak up every last drop of the delicious enchilada sauce. A fluffy Mexican Rice or a bright, zesty Cilantro Lime Rice are perfect choices.
- For a Simple Veggie Boost: A simple Grilled Corn Salad with a sprinkle of Cotija cheese or a quick Garlic Vegetable Sauté adds color and nutrients without much extra effort.
- The Interactive Topping Bar: Turn dinner into a fun, interactive experience! Set out the toppings from the next section in small bowls and let everyone build their own perfect plate. This is especially a big hit with kids and picky eaters.
The Topping Bar: 6 Ways to Customize Your Masterpiece
The right toppings are what take this dish from delicious to truly spectacular. Here are six distinct topping profiles, from classic and fresh to spicy and indulgent, so everyone at the table can create their perfect bite.
| Topping Profile | Core Ingredients | Best For… |
| 1. The Classic Fresco | Diced red onion, fresh cilantro, and a dollop of sour cream or Mexican crema. | A balanced, traditional finish that cools the palate and adds a bright, fresh counterpoint to the richness. |
| 2. The Creamy Avocado | Sliced or diced avocado, crumbled cotija or queso fresco cheese, and fresh lime wedges for squeezing. | Adding a cool, buttery texture and a touch of salty, tangy brightness that enhances all the other flavors. |
| 3. The Zesty Crunch | Fresh pico de gallo, crushed tortilla chips or Doritos, and thinly sliced radishes. | Introducing a burst of bright, acidic flavor from the salsa and a deeply satisfying textural crunch. |
| 4. The Smoky & Spicy | Sliced fresh or pickled jalapeños, a drizzle of chipotle-lime crema (sour cream mixed with lime juice and chipotle powder), and chopped green onions. | Those who enjoy a moderate to high level of heat and want to add a deep, smoky undertone to the dish. |
| 5. The Sweet Corn Salsa | A simple salsa made from grilled or canned corn, drained black beans, and diced red bell pepper. | A summery, slightly sweet contrast that adds beautiful color, texture, and a healthy dose of vegetables. |
| 6. The Ultimate Indulgence | An extra blanket of melted cheese, sliced black olives, and a generous drizzle of warm queso dip. | Maximizing the cheesy, comforting, and decadent qualities of the dish for the true cheese lovers at the table. |
Storing, Freezing, and Reheating Instructions
One of the best things about this casserole is that it makes for fantastic leftovers. The key to success is proper moisture management to ensure the texture stays perfect, even days later.
Storing Leftovers:
Allow the casserole to cool to room temperature before storing. Transfer it to an airtight container and refrigerate for up to 4 days. The flavors will meld and deepen overnight, but the tortellini will soften slightly as it sits.
Freezing Instructions (The Make-Ahead Meal Plan):
This dish is incredibly freezer-friendly, making it a perfect meal to prep for a busy day. You have two options:
- Method 1 (Best for Texture): Freeze Unbaked. This is the highly recommended method. Assemble the entire casserole in a freezer-safe baking dish (like a foil pan). Do not bake it. Cover the dish tightly with a layer of plastic wrap and then a layer of heavy-duty aluminum foil to prevent freezer burn. It can be frozen for up to 3 months. To cook, thaw the casserole in the refrigerator for 24 hours, then bake as directed, adding about 10-15 minutes to the total baking time since it will be starting from a colder temperature.
- Method 2 (Easiest): Freeze Baked. You can also freeze the fully cooked and cooled casserole. While convenient, be aware that the tortellini may have a slightly softer, gummier texture upon reheating compared to the unbaked method.
How to Reheat for Best Results:
- Oven (Recommended Method): For both large portions and single servings, the oven is your best bet for restoring texture. Place the leftovers in an oven-safe dish, cover with foil, and bake at 350°F (175°C) for 20-25 minutes, or until heated through. Remove the foil for the last 5 minutes of cooking to help the top cheese get bubbly and crisp again.
- Microwave (Fastest Method): For a quick single serving, the microwave works well. Place the casserole on a microwave-safe plate, cover loosely to prevent splatters, and heat in 1-minute intervals until hot. Note that this method will result in a softer texture and won’t be as crispy on top.
- Air Fryer (For Crispy Edges): For a single serving, the air fryer is a fantastic option. It quickly reheats the casserole while making the cheese and edges delightfully crispy. Place the leftovers in an air fryer-safe container and heat at 350°F (175°C) for 3-5 minutes, or until hot and bubbly.
Conclusion: Your New Weeknight Champion
There you have it—a delicious, one-pan fusion of Mexican and Italian cuisines that is destined to become your new weeknight champion. This Cheesy Beef Enchiladas Tortellini is more than just a recipe; it’s a solution for busy families who crave comforting, flavorful food without a lot of fuss. It’s easy, it’s customizable, and most importantly, it’s a dish that brings everyone to the table with a smile.
Did you try this Cheesy Beef Enchiladas Tortellini recipe? We’d love to hear how it went! Leave a rating and a comment below to share your experience and any creative twists you added! If you make it, share your creation on social media and tag us—we love seeing your kitchen masterpieces!
The Best Cheesy Beef Enchiladas Tortellini
Ingredients
Method
- Brown the Beef: Heat olive oil in a large, 12-inch oven-safe skillet over medium-high heat. Add the ground beef and chopped onion. Cook, breaking up the meat with a spoon, until the beef is no longer pink and the onion is soft (about 5-7 minutes). Drain any excess grease.
- Bloom Spices: Add the minced garlic and cook for 30-60 seconds until fragrant. Stir in the chili powder, cumin, paprika, oregano, salt, and pepper. Cook for another minute to toast the spices.
- Create the Sauce: Pour in the red enchilada sauce and the undrained can of diced tomatoes with green chiles. Stir well, scraping up any browned bits from the bottom of the pan. Bring to a simmer.
- Cook Tortellini: Add the frozen tortellini directly to the simmering sauce, stirring gently to coat. Cover the skillet, reduce heat to medium-low, and cook for 5-7 minutes, or until the tortellini is tender (al dente).
- Melt the Cheese: Turn off the heat. Sprinkle the shredded cheese blend evenly over the top. For a bubbly, golden-brown top, place the skillet under the oven broiler for 1-3 minutes (watch carefully!). Alternatively, cover with a lid for 2-3 minutes to melt the cheese.
- Rest and Serve: Let the casserole rest for a few minutes before serving. Garnish with your favorite toppings and enjoy!
Notes
- Grating Cheese: For the best, smoothest melt, grate your own cheese from a block. Pre-shredded cheese contains anti-caking agents that can affect the texture.
- Tortellini Type: Frozen tortellini is recommended for this one-pan recipe. If using fresh/refrigerated tortellini, reduce the cook time in Step 4 to just a few minutes. If using dried tortellini, you must cook it separately according to package directions before adding it to the skillet.
- Freezing: To freeze, assemble the casserole in a freezer-safe dish but do not bake. Cover tightly with plastic wrap and foil and freeze for up to 3 months. Thaw in the refrigerator overnight before baking as directed (add 10-15 minutes to the baking time).
- Vegetarian Option: Omit the ground beef and add 1-2 cans of black or pinto beans for a hearty vegetarian version.
FAQs (Cheesy Beef Enchilada Tortellini)
Can I make this casserole with raw ground beef to save a step?
While it might seem like a clever shortcut, we strongly advise against it. Browning the beef first is absolutely crucial for two main reasons: flavor and texture. The browning process, scientifically known as the Maillard reaction, creates deep, complex, savory flavors that you simply cannot achieve by boiling the meat in the sauce. Furthermore, browning renders out excess fat and gives the beef a pleasant, crumbly texture rather than a pale, boiled one.
My enchilada casserole was soggy. What did I do wrong?
This is a very common issue with layered casseroles, and it almost always comes down to moisture control. The number one cause of sogginess is too much liquid, which the pasta or tortillas absorb over time. To prevent this, ensure your enchilada sauce is reasonably thick, not watery. Don’t use more sauce than the recipe calls for—you want just enough to coat everything, not drown it. Finally, if you’re storing leftovers, let the casserole cool completely before covering and refrigerating it, as this reduces condensation and trapped steam.
Can I use flour tortillas instead of tortellini for a more traditional enchilada casserole?
You certainly can, but it’s important to know that it will change the dish significantly. Flour tortillas have a very different texture from corn tortillas or pasta; they tend to absorb much more liquid and can become quite soft, gummy, or even mushy in a layered casserole, especially when made ahead. If you choose to use flour tortillas, it’s highly recommended to lightly fry them in a bit of oil for about 10 seconds per side first. This creates a slight barrier that helps prevent them from soaking up too much sauce.
What’s the best way to freeze this casserole? Before or after baking?
Both methods are possible, but for the best possible texture upon reheating, we recommend freezing the casserole before you bake it. Simply assemble the dish completely in a freezer-safe pan, wrap it tightly in both plastic wrap and foil, and freeze for up to three months. When you’re ready to eat, thaw it in the refrigerator overnight and then bake as directed, adding about 10-15 extra minutes to the baking time. Freezing an already-baked casserole is easier, but the tortellini will likely be a bit softer after being cooked, frozen, and reheated.
Can I use a different size baking dish?
It’s always best to use the recommended dish size—in this case, a large, 12-inch oven-safe skillet or a 9×13-inch baking dish—to ensure the casserole cooks evenly. If you use a smaller, deeper dish, the cooking time will increase, and you risk having overcooked edges with a cool, undercooked center. Conversely, a larger, shallower dish will cook much faster. If you must substitute, be prepared to adjust your baking time and check the internal temperature with a thermometer to ensure it reaches a food-safe 165°F in the center.
Can I make this vegetarian?
Absolutely! This recipe is very easy to adapt for a vegetarian diet. To make a delicious vegetarian version, simply omit the ground beef and add an extra can of black beans or pinto beans to make it just as hearty. For even more substance and veggie power, you could also add sautéed mushrooms, finely grated zucchini, or sweet corn to the filling.
Did You Love Our Recipe?
There are no reviews yet. Be the first one to write one.