How to Make Crack Breakfast Sliders in 25 Min
Table of Contents
Did you know the average American spends 37 minutes a day on meal prep and cleanup? In a world where busy lifestyles are the norm and 65% of people eat fast food at least once a week for convenience, finding time for a satisfying, home-cooked meal can feel impossible. What if you could serve a hot, crowd-pleasing breakfast that everyone raves about in just 25 minutes?
That’s where these legendary Crack Breakfast Sliders come in. They aren’t just a recipe; they’re a system for reclaiming your mornings, winning brunch, and becoming a game-day hero. These sweet and savory, melt-in-your-mouth sandwiches, baked to perfection on soft Hawaiian rolls, are about to become your new obsession. This guide provides the ultimate blueprint, packed with pro tips to avoid common mistakes, brilliant make-ahead strategies for stress-free hosting, and creative serving ideas that will elevate your breakfast game.
Why You’ll Love This Recipe
This recipe has achieved legendary status for a reason. It’s the perfect storm of flavor, convenience, and crowd-pleasing appeal. Here’s exactly why these Crack Breakfast Sliders will become a staple in your kitchen:
- A Perfect Symphony of Sweet and Savory: The experience begins with the iconic sweetness of soft Hawaiian rolls, a perfect counterpoint to the salty richness of savory breakfast sausage and crispy, thick-cut bacon. This delicious tension is harmonized by layers of fluffy eggs and rivers of gooey, melted cheese. The final touch—a buttery glaze brushed over the top—cements this as a truly unforgettable bite.
- Effortless & Incredibly Quick: With just 10-15 minutes of active prep and a total time of about 25-30 minutes, this is a beginner-friendly masterpiece. It’s a one-pan baking wonder that streamlines the process and minimizes cleanup, making it a true kitchen hero on busy mornings.
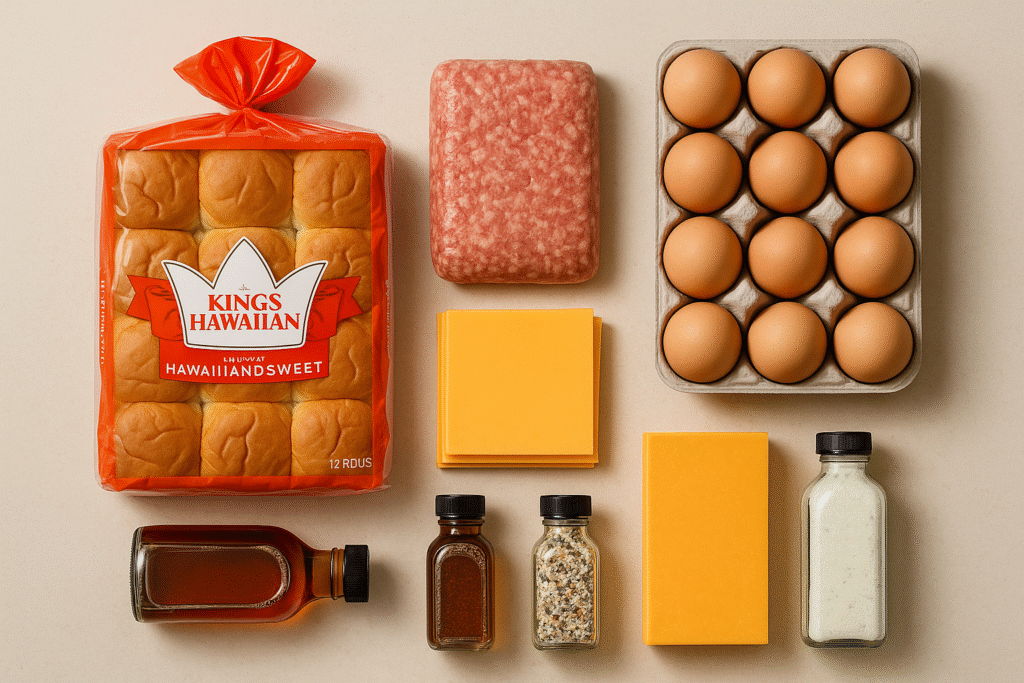
- Pantry Staples & Easy-to-Find Ingredients: This recipe relies on simple, accessible ingredients you likely have on hand or can easily find at any grocery store: breakfast sausage, bacon, eggs, cheese, and a package of those irresistible King’s Hawaiian rolls.
- Infinitely Adaptable: Consider this a blueprint for deliciousness. The beauty of the slider is its evolution from a simple fast-food item to a versatile culinary platform. You can easily swap sausage for ham, use your favorite combination of cheeses, make it vegetarian with sautéed veggies, or create a spicy Southwest version with chorizo and chipotle mayo. We’ll even show you three different glazes to completely change the flavor profile to your liking.
- Perfect for ANY Occasion: This is the ultimate crowd-pleaser. These sliders are the star of any event, whether it’s a special holiday morning like Christmas, a lazy weekend brunch, a high-energy game-day tailgate, or even a fun “breakfast for dinner” night. They are a guaranteed win for family meals and picky eaters alike.
- Protein-Packed & Deeply Comforting: Loaded with eggs, sausage, and bacon, these sliders are a protein powerhouse designed to keep you full and satisfied for hours. They deliver the ultimate comfort food experience in one perfect, handheld package.
- Tested, Perfected, and Foolproof: This isn’t just one recipe; it’s the culmination of dozens of the most popular versions online. We’ve analyzed the common threads, identified the critical techniques that separate good from great, and perfected the ratios to guarantee flawless, rave-worthy results every single time.
Ingredients You’ll Need: The Anatomy of the Perfect Slider
The magic of these Crack Breakfast Sliders lies in the synergy of a few perfect components. Each ingredient is chosen for a specific role, working together to create a balanced, addictive, and structurally sound sandwich. Let’s break down the “why” behind each one.
The Rolls: The Sweet Foundation
- Primary Recommendation: 1 (12-count) package of King’s Hawaiian Original Sweet Rolls. Their unique sweetness and soft, pillowy texture are essential for creating the classic sweet-and-savory contrast that defines this recipe. They are truly the “star of the show”.
- Substitutions: Other soft dinner rolls, brioche slider buns, or potato rolls can work, but be aware that the final flavor profile will be more savory and less complex.
The Proteins: The Savory Heart
- Sausage: 1 lb ground pork breakfast sausage (such as Jimmy Dean) is the classic choice. Its flavor is iconic, and its texture allows it to be crumbled and form an even, consistent layer within the sliders.
- Bacon: 6-8 slices of thick-cut bacon, cooked until crispy and then crumbled or chopped. Using thick-cut bacon is key, as it provides a more substantial texture and a pronounced smoky, salty flavor that won’t get lost among the other ingredients.
- Substitutions: Feel free to use sliced deli ham, Canadian bacon, turkey sausage/bacon, or even spicy chorizo for a flavor twist.
The Eggs: The Fluffy Binder
- Recommendation: 8-10 large eggs. The secret to making them exceptionally light and fluffy is whisking in about ¼ cup of a liquid like milk or, for extra richness, heavy cream. This liquid creates steam as the eggs cook, resulting in a creamier, more luxurious texture.
The Cheesy Glue: The Key to Melty Perfection
- The Two-Cheese Strategy: This is an expert technique for achieving both maximum meltiness and deep flavor.
- For Melt: 8 slices of American cheese. This is non-negotiable for achieving that classic, gooey, diner-style melt factor. Critically, it also acts as a hydrophobic barrier on the bottom buns, protecting them from moisture and preventing sogginess.
- For Flavor: 1-2 cups of shredded sharp cheddar or Colby Jack cheese. For the best results, grate your own cheese from a block. Pre-shredded cheeses are often coated with anti-caking agents that can inhibit a smooth, creamy melt.
- Substitutions: Pepper Jack adds a welcome kick of heat, while Provolone, Swiss, or Muenster offer milder but equally delicious alternatives.
The Signature Glaze: The Flavor-Defining Finish
Choose your flavor adventure. The glaze is what truly defines your sliders and takes them from great to unforgettable.
- Glaze Option 1 (The Classic Sweet & Savory): Maple-Butter Glaze. Combine ¼ cup melted butter with 2 tablespoons of pure maple syrup. This iconic glaze creates an “almost a glazed doughnut” effect on the sweet rolls, perfectly balancing all the savory elements.
- Glaze Option 2 (The Ultimate Savory): Everything Bagel Butter. Combine ¼ cup melted butter with 1 tablespoon of Everything But The Bagel Seasoning. This is a fan-favorite for a reason, adding a savory, crunchy, and aromatic topping that mimics a classic bagel.
- Glaze Option 3 (The Zesty & Tangy): Savory Ranch Butter. Combine ¼ cup melted butter with 1 tablespoon of dry ranch seasoning mix. This option delivers a uniquely addictive, herby, and tangy flavor that will have everyone asking for your secret ingredient.
| Ingredient Category | Recommended | Substitution Option 1 | Substitution Option 2 | Expert Notes |
| Rolls | 12-ct King’s Hawaiian Sweet Rolls | Soft Potato Rolls | Brioche Slider Buns | The signature sweet/savory balance comes from Hawaiian rolls. Other rolls will result in a more savory slider. |
| Protein | 1 lb Pork Sausage & 6-8 slices Bacon | 1 lb Deli Ham | 1 lb Chorizo | For a classic flavor, use both sausage and bacon. Ham offers a milder taste. Chorizo adds a spicy Southwest kick. |
| Cheese | 8 slices American & 2 cups shredded Cheddar | Pepper Jack | Provolone or Swiss | American cheese is key for melt and moisture protection. Pair it with a flavor cheese like cheddar or pepper jack. |
| Glaze | Maple-Butter | Everything Bagel Butter | Ranch Butter | The glaze defines the final flavor. Choose maple for sweet/savory, Everything Bagel for savory crunch, or Ranch for tangy herbs. |
Step-by-Step Instructions
Step 1: Prep Your Oven and Cook the Proteins
First, preheat your oven to 350°F (175°C). Lightly grease a 9×13-inch baking dish to prevent sticking. While the oven heats up, focus on the proteins. Cook your 1 lb of breakfast sausage in a large skillet over medium heat, using a spatula to crumble it as it browns. Once cooked through, use a slotted spoon to transfer it to a paper towel-lined plate. This step is critical—draining the excess grease is your first line of defense against soggy sliders. In the same or a separate skillet, cook your bacon until it reaches your desired crispiness, then set it aside on paper towels as well before crumbling or chopping it.
Step 2: Master the Eggs (The “Egg Sheet” Trick)
Here’s a professional tip for creating sliders that are neat and easy to eat: make a single “egg sheet” instead of loose, messy scrambled eggs. In a medium bowl, vigorously whisk together 8-10 eggs, ¼ cup of heavy cream (for richness) or milk (for lightness), and a pinch of salt and pepper until uniform and slightly frothy. You have two excellent methods for cooking this:
- The Oven Method: Line a 9×13-inch baking pan with parchment paper, pour in the egg mixture, and bake for approximately 15 minutes, or until the eggs are just set.
- The Skillet Method: Pour the egg mixture into a large, greased non-stick skillet over low heat. Allow the eggs to cook gently, without much stirring, to form a large, omelet-like sheet that you can fold to fit the rolls.
Crucial Tip: Whichever method you choose, slightly undercook the eggs. They should look just set but still be very moist. They will finish cooking in the oven from residual heat, and this prevents them from becoming dry and rubbery.
Step 3: Assemble Your Layers of Flavor
Using a long, serrated bread knife, carefully slice the entire slab of Hawaiian rolls in half horizontally, ensuring the individual rolls remain connected in a single top and bottom sheet. Place the bottom half, cut-side up, into your prepared baking dish. Now, it’s time to build your masterpiece with strategic layering:
- Layer 1 (The Moisture Barrier): Arrange 8 slices of American cheese across the bottom rolls, overlapping them slightly to create a solid shield. This cheese layer is scientifically functional: its fat content creates a hydrophobic barrier that “locks” in the subsequent ingredients and prevents moisture from the meat and eggs from seeping into the delicate bread.
- Layer 2 (The Meats): Sprinkle the drained, cooked sausage crumbles evenly over the cheese, followed by a layer of the crispy, crumbled bacon.
- Layer 3 (The Eggs): Carefully slide or place your “egg sheet” on top of the meat layer. If you made traditional scrambled eggs, spread them in an even layer.
- Layer 4 (The Flavor Cheese): Sprinkle your 1-2 cups of shredded cheddar or Colby Jack cheese evenly over the eggs.
- Layer 5 (The Top): Gently place the top half of the rolls back on, completing the sandwiches.
Step 4: The Signature Glaze and Two-Stage Bake
In a small bowl, whisk together the ingredients for your chosen glaze—whether it’s the Maple-Butter, Everything Bagel, or Ranch Butter. Using a pastry brush, coat the tops of the rolls generously with the mixture, making sure to let some of it drip down the sides and between the individual sliders for maximum flavor infusion. Now, for the final, critical step—the two-stage bake, which manages heat transfer for a perfect result.
- Bake Stage 1 (The Melt): Cover the baking dish tightly with aluminum foil. This traps steam and creates a gentle, humid environment (convective heat), which allows the cheese to melt perfectly and the entire slider to heat through without the rolls drying out or burning. Bake for 15-20 minutes.
- Bake Stage 2 (The Golden Finish): Remove the aluminum foil. This exposes the rolls to direct, radiant heat. Bake for another 5-7 minutes. During this stage, the Maillard reaction will occur, giving the tops a beautiful golden-brown color and a slightly crisp texture, preventing any sogginess from the glaze.
Serving Suggestions: The Art of Serving: From Simple Sides to a Full Brunch Spread
These sliders are a complete meal in themselves, but pairing them with the right sides and sauces can turn a simple breakfast into an unforgettable feast.
The Dipping Sauce Bar
Elevate the experience by offering a variety of dipping sauces. This interactive element is always a hit with guests.
- Sweet: A small pitcher of warm, pure maple syrup is a classic choice that leans into the sweet-and-savory profile.
- Spicy & Creamy: A homemade Sriracha Mayo is a game-changer. Simply whisk together ½ cup of mayonnaise, 1-2 tablespoons of Sriracha (to your heat preference), and 1 teaspoon of Worcestershire sauce.
- Rich & Savory: For a truly decadent brunch, serve with a side of classic sausage gravy or a velvety hollandaise sauce.
- Fresh & Zesty: A bright, fresh salsa or pico de gallo provides a wonderful acidic contrast to the richness of the sliders.

Building a Full Menu
Whether for a holiday brunch or a weekend get-together, you can easily build a full menu around these sliders. The key is to balance their richness with fresh or contrasting flavors.
| Occasion | Slider Glaze Choice | Main Side Dish | Lighter Side Dish | Suggested Beverage |
| Elegant Holiday Brunch | Maple-Butter Glaze | Slow Cooker Cheesy Hash Brown Casserole | Fresh Fruit Platter with Yogurt | Coffee & Mimosas |
| Ultimate Game Day Spread | Everything Bagel Butter Glaze | Crispy Tater Tots or Air Fryer Fries | Arugula Salad with Lemon Vinaigrette | Craft Beer or Iced Tea |
| Effortless Weeknight ‘Brinner’ | Savory Ranch Butter Glaze | Crispy Hash Brown Patties | Sliced Tomatoes and Avocado | Orange Juice or Milk |
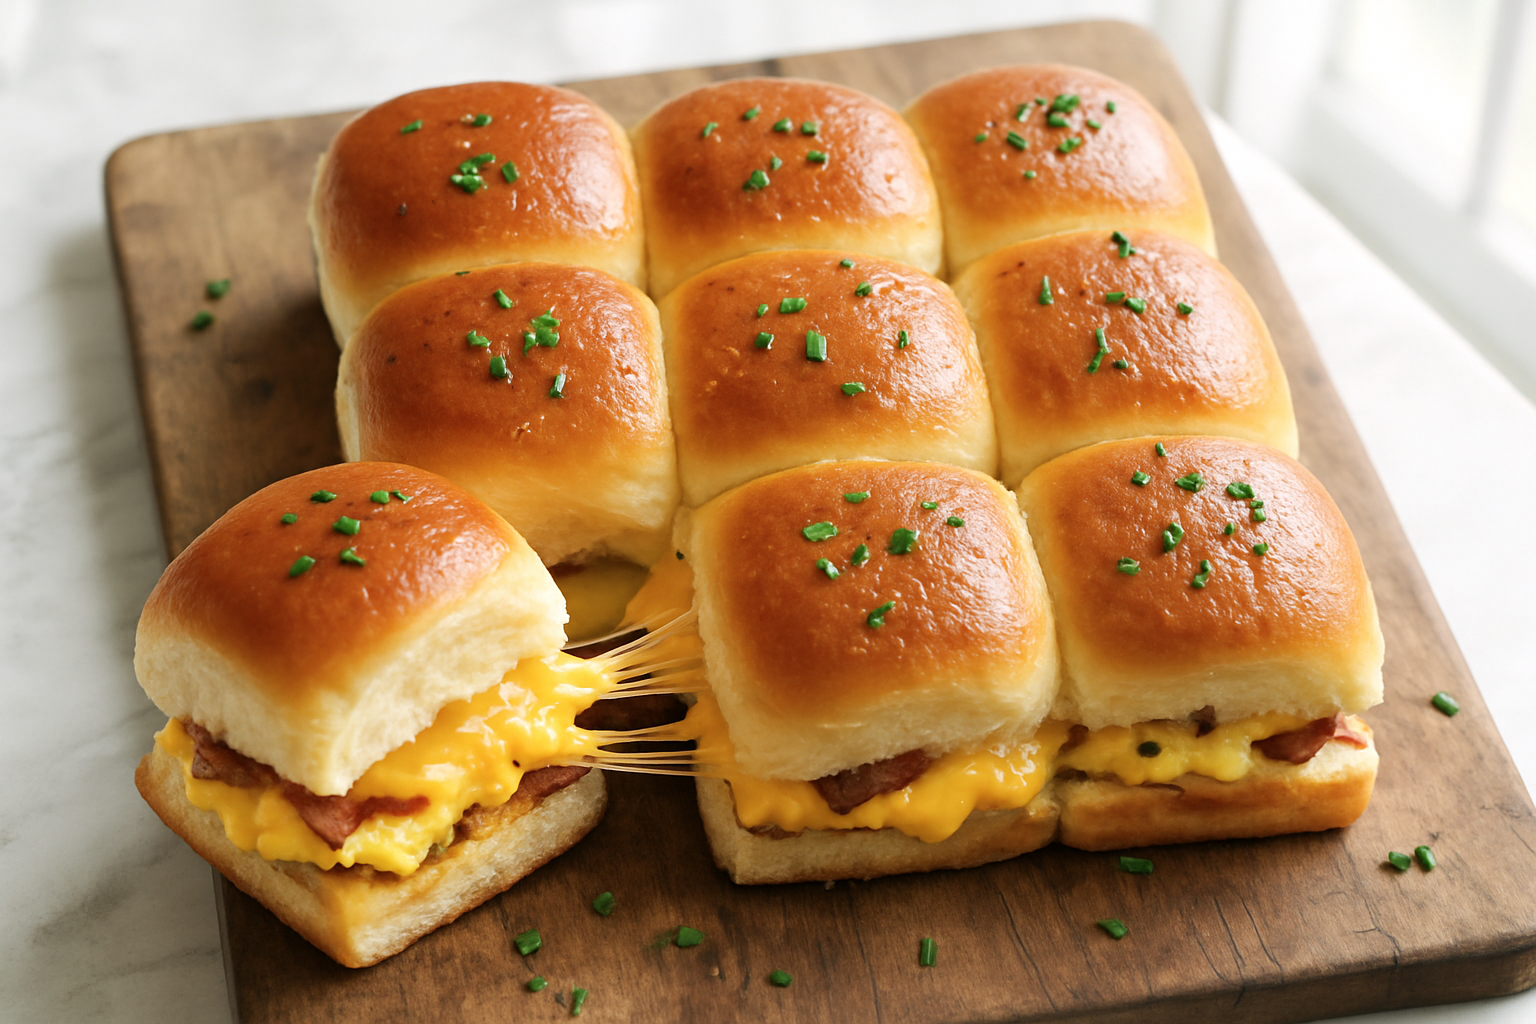
Presentation is Key
For parties and gatherings, presentation makes all the difference. After baking, use a sharp knife to cut along the seams and fully separate the individual sliders. Arrange them on a large platter or a rustic wooden charcuterie board. Garnish with a sprinkle of finely chopped fresh chives or parsley for a pop of color and freshness. This makes them perfect, easy-to-grab finger food for any occasion.
Storing INSTRUCTIONS: The Ultimate Make-Ahead & Storage Playbook
One of the greatest strengths of this recipe is its incredible versatility for meal prep. Whether you’re planning for a stress-free holiday morning or stocking your freezer for busy weekdays, this playbook has you covered.
The Make-Ahead Strategy (Refrigerator)
This is the secret to a relaxed and impressive brunch. You can fully assemble the sliders—building all the layers in the baking dish—up to 48 hours in advance. Do not add the glaze yet. Cover the dish tightly with aluminum foil and store it in the refrigerator.
When you’re ready to bake, remove the dish from the fridge and let it sit on the counter while the oven preheats. This helps it bake more evenly. Just before placing it in the oven, prepare and brush on your chosen glaze. Bake as directed, but add an extra 5-10 minutes to the initial covered baking time to ensure the cold sliders are heated all the way through to the center.
The Freezer Meal Strategy (Freezer)
These sliders freeze beautifully, making them a perfect solution for a quick, hot breakfast on demand.
- Method: Follow the recipe to bake the sliders completely, then let them cool to room temperature. This cooling step is crucial to prevent ice crystals from forming. You can either leave the sliders as a whole slab or cut them into individual portions. Wrap them tightly first in plastic wrap, then in a layer of aluminum foil for extra protection against freezer burn. Place the wrapped sliders in a large freezer-safe bag or container. They will keep perfectly for up to 3 months.
- Reheating from Frozen: There’s no need to thaw! Simply unwrap the frozen sliders, place them on a baking sheet, and bake in a preheated 350°F (175°C) oven for 20-25 minutes, or until they are hot and the cheese is remelted and bubbly. For individual sliders, you can also reheat them in the microwave for 45-60 seconds or in an air fryer for a few minutes until heated through.
Storing Leftovers
In the rare event that you have leftovers, they are just as delicious the next day. Store them in an airtight container in the refrigerator for up to 3-4 days. Reheat them using your preferred method—the oven or air fryer will give you the best texture, while the microwave is fastest.
Conclusion: Your Breakfast Masterpiece Awaits
You’re now equipped with everything you need to make the most addictive, versatile, and convenient breakfast imaginable. With its irresistible layers of savory sausage and bacon, fluffy eggs, and gooey cheese, all nestled in sweet Hawaiian rolls and finished with a signature glaze, these Crack Breakfast Sliders are more than a meal—they’re an event. In just about 25 minutes, you can have a crowd-pleasing dish that’s perfect for any occasion, from a lazy Sunday morning to a bustling holiday brunch.
Now it’s your turn to join the revolution! Try this recipe and let us know which glaze you chose in the comments below. We love seeing your creations and hearing your success stories! Don’t forget to leave a 5-star review if you loved it, as it helps other readers find this recipe.
How to Make Crack Breakfast Sliders in 25 Min
Ingredients
Method
- Preheat & Prep: Preheat oven to 350°F (175°C). Lightly grease a 9×13-inch baking dish.
- Cook Proteins: In a large skillet, cook and crumble the sausage until browned. Drain all grease and set aside. Cook bacon until crispy, crumble, and set aside.
- Make Eggs: In a bowl, whisk eggs, milk, salt, and pepper. Cook in a large non-stick skillet over low heat to form a single "egg sheet," or bake in a parchment-lined 9×13 pan for 15 mins until just set. Ensure eggs are slightly undercooked and moist.
- Assemble: Slice the slab of rolls in half horizontally. Place the bottom half in the prepared baking dish.
- Layer: Build your sliders in this order: American cheese slices (bottom), sausage crumbles, bacon crumbles, the egg sheet, and finally the shredded cheddar. Place the top half of the rolls on.
- Glaze: In a small bowl, whisk together the melted butter and maple syrup for the glaze. Brush generously over the tops of the rolls, letting some drip down the sides.
- Bake (Stage 1): Cover the dish tightly with aluminum foil and bake for 15-20 minutes, until heated through and cheese starts to melt.
- Bake (Stage 2): Remove the foil and bake for another 5-7 minutes, until the tops are beautifully golden brown and the cheese is bubbly.
- Serve: Let the sliders rest for a few minutes before cutting along the seams and serving immediately.
Notes
- No Soggy Sliders: Draining the meat grease thoroughly and using the American cheese layer on the bottom are crucial steps to prevent soggy buns.
- Make-Ahead Tip: You can fully assemble the sliders (without the glaze) up to 48 hours in advance. Store covered in the fridge. Add the fresh glaze just before baking, adding 5-10 minutes to the covered bake time.
- Glaze Variations: For a savory twist, try the “Everything Bagel Butter” or “Savory Ranch Butter” glazes mentioned in the full blog post.
- Best Cheese Melt: For the creamiest, smoothest melt, buy a block of sharp cheddar and shred it yourself. Pre-shredded cheeses have anti-caking agents that can make them grainy.
FAQs: Your Questions, Answered: The Official Crack Breakfast Sliders FAQ
How do I keep my breakfast sliders from getting soggy?
This is the most common concern, and there are three key tricks to guarantee success. First, drain your cooked sausage and bacon thoroughly on paper towels to remove as much grease as possible. Second, use a layer of sliced American cheese directly on the bottom buns; it acts as a delicious moisture barrier. Finally, use the two-stage baking method: bake covered with foil first to steam and melt, then uncover for the last 5-7 minutes to let the tops get golden and crisp, driving off any surface moisture.
Can I make these ahead of time?
Absolutely! This recipe is a meal-prepper’s dream. You can assemble them without the glaze, cover, and refrigerate for up to 48 hours. You can also bake, cool completely, and freeze them for up to 3 months. All the detailed instructions are in our ‘Make-Ahead & Storage Playbook’ section above.
What are the best rolls to use?
King’s Hawaiian sweet rolls are highly recommended as their sweetness is iconic to the recipe’s flavor profile. However, any soft slider bun, such as potato rolls or butter rolls, will also work wonderfully if you prefer a more savory sandwich.
Can I use shredded cheese instead of slices?
Yes, but with a strategy. Sliced cheese, particularly American, is best for the bottom layer because it creates a more effective, uniform barrier against moisture. For the top layer of cheese (the “flavor cheese”), freshly shredded cheese is fantastic because it melts more smoothly and creamily than pre-shredded varieties, which contain anti-caking additives.
What are some good vegetarian variations?
It’s very easy to make these vegetarian and just as delicious. Omit the meat and load up the egg layer with sautéed vegetables like chopped spinach, mushrooms, and bell peppers. You can also use your favorite plant-based sausage patties or crumbles, or even tempeh bacon for a smoky flavor.
My eggs always seem dry. What am I doing wrong?
The secret is to intentionally undercook your eggs before you assemble the sliders. They should be just set but still very soft and moist. They will continue to cook from the residual heat and the heat of the oven. If you put fully cooked eggs into the sliders, they will inevitably become overcooked, dry, and rubbery by the time the sliders are done baking.
How many sliders should I plan per person?
This depends on the occasion. If the sliders are the main course for a brunch or “brinner,” a good rule of thumb is 2-3 sliders per adult. If you are serving them as part of a larger buffet or as one of several appetizers at a party, planning on 1-2 per person is usually sufficient.
Did You Love Our Recipe?
There are no reviews yet. Be the first one to write one.