Best Honey Garlic Chicken Breasts: 5 Secrets for Sauce
Table of Contents
Did you know that while nearly 90% of us believe cooking at home is healthier and more budget-friendly than takeout, over half of us feel we’re just too short on time to do it consistently? It’s the classic weeknight dilemma: you crave something delicious and satisfying, but the thought of a complex, time-consuming meal (and the cleanup!) makes dialing for delivery seem so much easier.
What if you could solve that dilemma tonight? What if you could create a meal that’s not only faster and healthier than ordering in, but also tastes infinitely better? This is it. Our perfected Honey Garlic Chicken Breasts recipe is your 25-minute solution to a spectacular weeknight win. Forget the soggy, overly-sweet takeout versions. We’re about to unlock the secrets to creating impossibly juicy chicken with a sticky, savory, and utterly addictive honey garlic sauce that will have everyone asking for seconds. This isn’t just another recipe; it’s your new go-to for conquering dinner.
Why You’ll Love This Honey Garlic Chicken Breasts Recipe
This recipe has become a viral sensation in our test kitchen for good reason. It consistently delivers restaurant-quality results with home-cook-friendly effort. Here’s why you’ll be adding it to your weekly rotation:
- Irresistible Flavor: It strikes the perfect chord between sweet, savory, and tangy. The sticky, glossy honey garlic sauce coats every morsel of chicken, creating a flavor explosion in every bite.
- Faster Than Takeout: From prep to plate, this entire meal comes together in about 25 minutes. That’s less time than it takes to decide on a delivery order and wait for it to arrive.
- Effortless & Beginner-Friendly: This is a true one-pan wonder. The steps are simple, the techniques are straightforward, and the cleanup is a breeze, making it perfect for cooks of all skill levels.
- Pantry-Staple Magic: You likely have all the core ingredients—chicken, honey, soy sauce, garlic—in your kitchen right now. It’s a high-reward meal without the need for a special grocery trip.
- A Certified Family Favorite: This dish has universal appeal. The flavor profile is sophisticated enough for adults but familiar and delicious enough to win over even the pickiest eaters.
- Healthy-ish & High-Protein: As a protein-packed meal, it keeps you full and satisfied. Because you control the ingredients, you can manage the sodium and sugar, making it a far healthier choice than most fast-food options.
- Perfected and No-Fail: We’ve tested every variable and synthesized the best techniques from countless versions to create one definitive, foolproof recipe. The five secrets we share below guarantee your success.
Ingredients You’ll Need
The magic of this dish lies in how a few simple, high-quality ingredients combine to create something truly special. We’ve organized them for clarity.
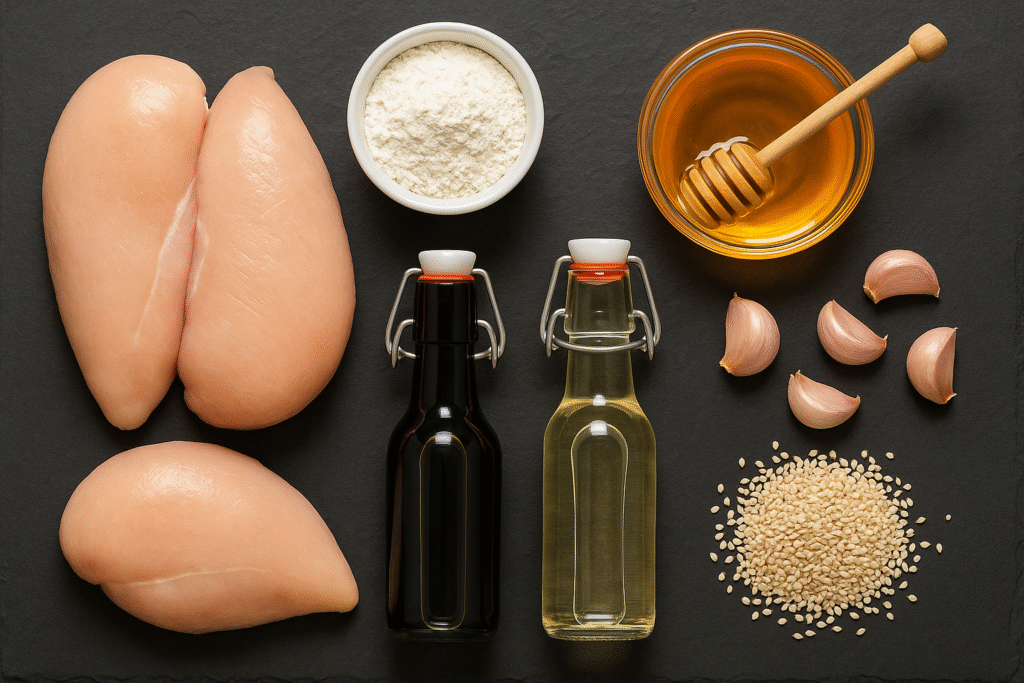
For the Perfect Honey Garlic Chicken Breasts:
- Boneless, Skinless Chicken Breasts: You’ll need 4 medium chicken breasts (about 1.5 to 2 pounds total). Look for fresh, plump breasts. We’ll be slicing them to ensure they cook quickly and evenly.
- All-Purpose Flour or Cornstarch: Just a ¼ cup gives the chicken a light coating. This isn’t for heavy breading; it’s the secret to forming a golden crust and helps our glorious sauce cling to the chicken.
- Simple Seasonings: You’ll need ¼ teaspoon each of salt, black pepper, and garlic powder to season the chicken before it hits the pan.
- Olive Oil & Butter: A combination of 1 tablespoon of olive oil and 1 tablespoon of butter creates the perfect cooking base. The oil prevents the butter from burning, while the butter adds richness and helps achieve that beautiful golden-brown color.
For the 5-Secret Sticky Sauce:
- Honey: The star of the show! You’ll need ⅓ cup of a good quality, clear liquid honey. Standard clover or wildflower honey works perfectly. Avoid using creamed or strongly flavored honeys like buckwheat, as they can overwhelm the other flavors.
- Low-Sodium Soy Sauce: This is non-negotiable for flavor balance. Using 3 tablespoons of low-sodium soy sauce (or tamari for a gluten-free option) provides all the savory, umami depth without making the dish overly salty.
- Vinegar: Two tablespoons of rice vinegar or apple cider vinegar are essential. The gentle acidity cuts through the sweetness of the honey and the saltiness of the soy sauce, brightening the entire dish.
- Fresh Garlic: You’ll need 4-6 cloves, freshly minced. This is where the aromatic magic happens. Pre-minced jarred garlic can work in a pinch, but the flavor of fresh is unparalleled.
- Cornstarch: One tablespoon of cornstarch mixed with 2 tablespoons of cold water creates a “slurry” that will instantly thicken our sauce into a perfect, glossy glaze.
- Optional Kick: For a touch of heat, have some red pepper flakes or a teaspoon of Sriracha on hand.
- Garnish: Thinly sliced green onions and a sprinkle of sesame seeds are the perfect finishing touch, adding freshness and a nutty aroma.
How to Make the Best Honey Garlic Chicken Breasts: A Step-by-Step Guide
Here we’ll walk through the process, revealing the five secrets that elevate this dish from good to unforgettable.
Step 1: Prep the Chicken (Secret #4 is here!)
The foundation of juicy, evenly cooked chicken is proper preparation. Secret #4: Create the perfect canvas for the sauce. First, if your chicken breasts are thick, slice them in half horizontally to create four thinner cutlets. This ensures they cook quickly and evenly, preventing the dreaded “dry on one end, raw on the other” scenario. Next, and this is crucial,
pat the chicken completely dry with paper towels. Excess moisture is the enemy of a good sear; removing it allows a beautiful golden-brown crust to form instead of the chicken just steaming in the pan. Season the dry chicken pieces all over with salt, pepper, and garlic powder, then dredge them lightly in the flour, shaking off any excess.
Step 2: Season and Sear for a Golden Crust (Secret #5 is here!)
Now for the most important part of cooking the chicken. Secret #5: Master heat management for a perfect sear. Heat the olive oil and butter in a large skillet (cast iron, stainless steel, or non-stick all work) over medium-high heat. The pan must be hot before the chicken goes in. Place the floured chicken breasts in the skillet, but
do not overcrowd the pan. If necessary, cook them in two batches. Overcrowding lowers the pan’s temperature, causing the chicken to steam instead of sear. Once in the pan,
don’t move the chicken for about 4-5 minutes. Let it develop a deep, golden-brown crust. Flip and cook for another 4-5 minutes until cooked through. Remove the chicken to a plate and set aside.
Step 3: Mix the 5-Ingredient Secret Sauce (Secret #1 is here!)
While the chicken is searing, you can prepare the sauce. Secret #1: Build the flavor foundation by balancing the core trio. In a small bowl, whisk together the honey, low-sodium soy sauce, and rice (or apple cider) vinegar. This simple trio is the heart of the sauce. The low-sodium soy sauce is key, as it allows the sweet notes of the honey and the bright tang of the vinegar to shine without being overpowered by saltiness. This is also the time to decide if you want a little heat—whisk in red pepper flakes or Sriracha now if using.
Step 4: Create the Perfect Sticky Glaze (Secrets #2 & #3 are here!)
With the chicken resting, turn the heat down to medium-low. If there are any burnt bits in the pan, wipe them out, but leave the delicious browned drippings (the fond). Add the minced garlic to the pan. Secret #2: Infuse the aromatics without the burn. Sauté the garlic for only 30-60 seconds until it’s fragrant. Do not let it brown, or it will turn bitter and ruin the sauce. A great tip is to chop the garlic by hand instead of using a press; the slightly larger pieces are less prone to burning.
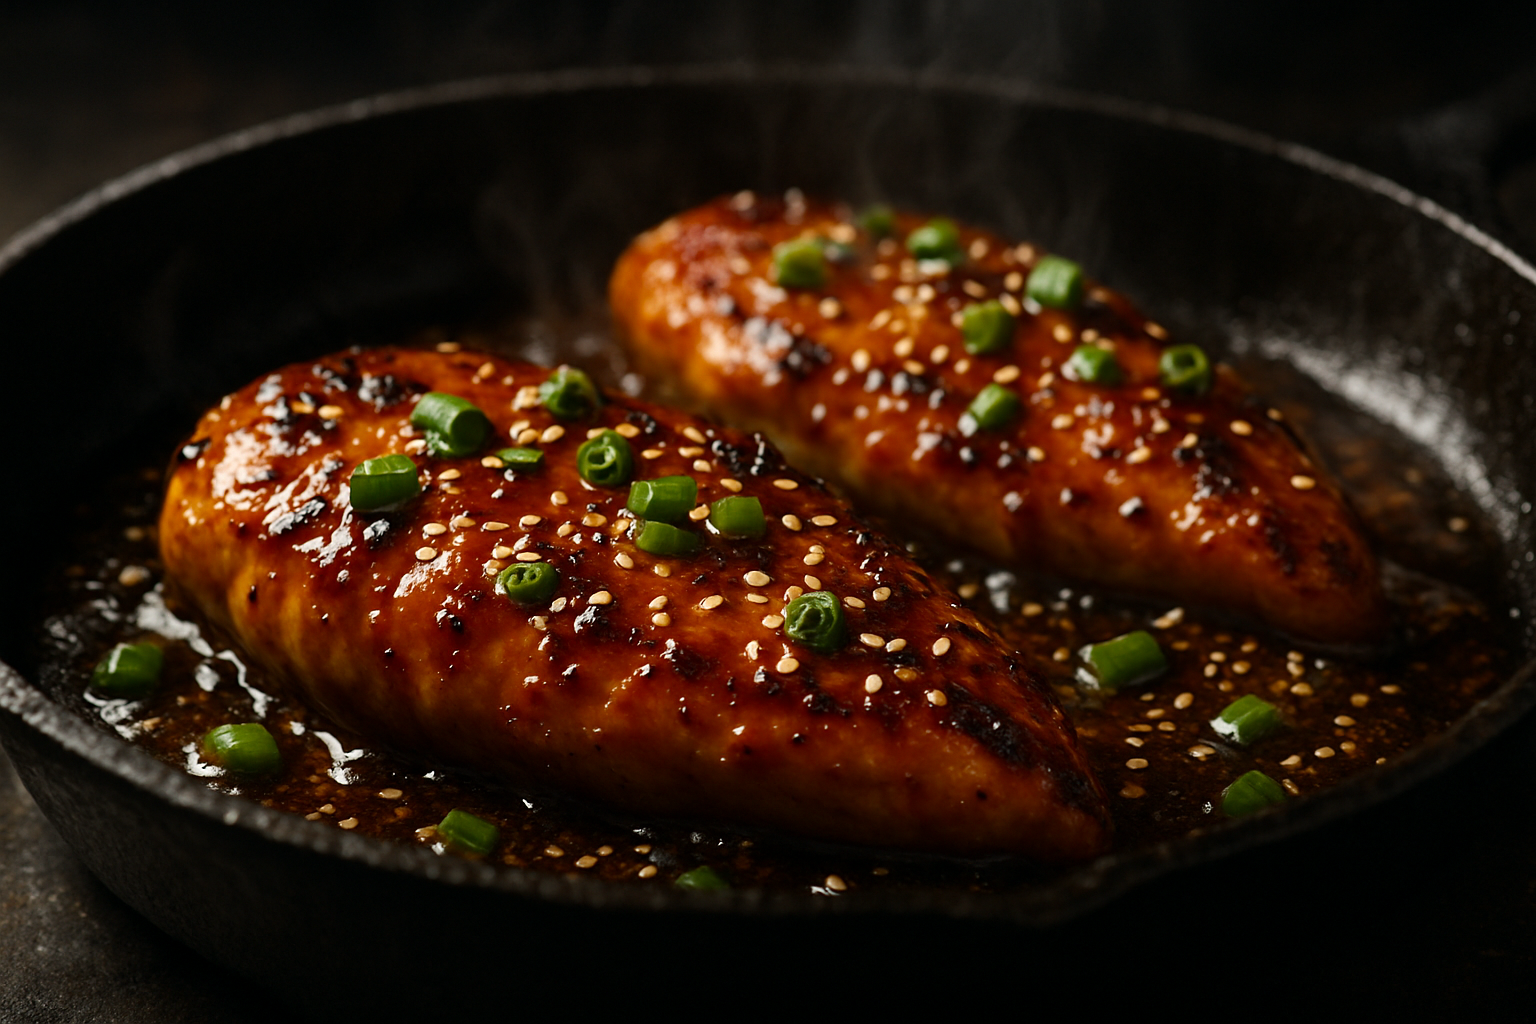
Now, pour the honey-soy mixture into the pan, scraping up any browned bits from the bottom. Let it simmer for about a minute. Here comes the final trick. Secret #3: Use a cornstarch slurry for a guaranteed sticky glaze. In a separate small bowl, whisk the 1 tablespoon of cornstarch with 2 tablespoons of cold water until completely smooth. Pour this slurry into the simmering sauce and stir continuously. Within a minute, the sauce will transform, thickening into a beautiful, glossy, and perfectly sticky glaze that will cling to your chicken.
Step 5: Combine and Serve
Turn off the heat. Return the seared chicken breasts and any accumulated juices from the plate back into the skillet. Turn the chicken over in the glorious sauce, ensuring every piece is generously coated. Let it sit in the warm pan for a minute to heat through. Serve immediately, spooning any extra sauce from the pan over the top. Garnish with sliced green onions and sesame seeds.
Creative Serving Suggestions
While this honey garlic chicken breasts recipe is a star on its own, it pairs beautifully with a variety of sides. Here are some of our favorite ways to serve it:
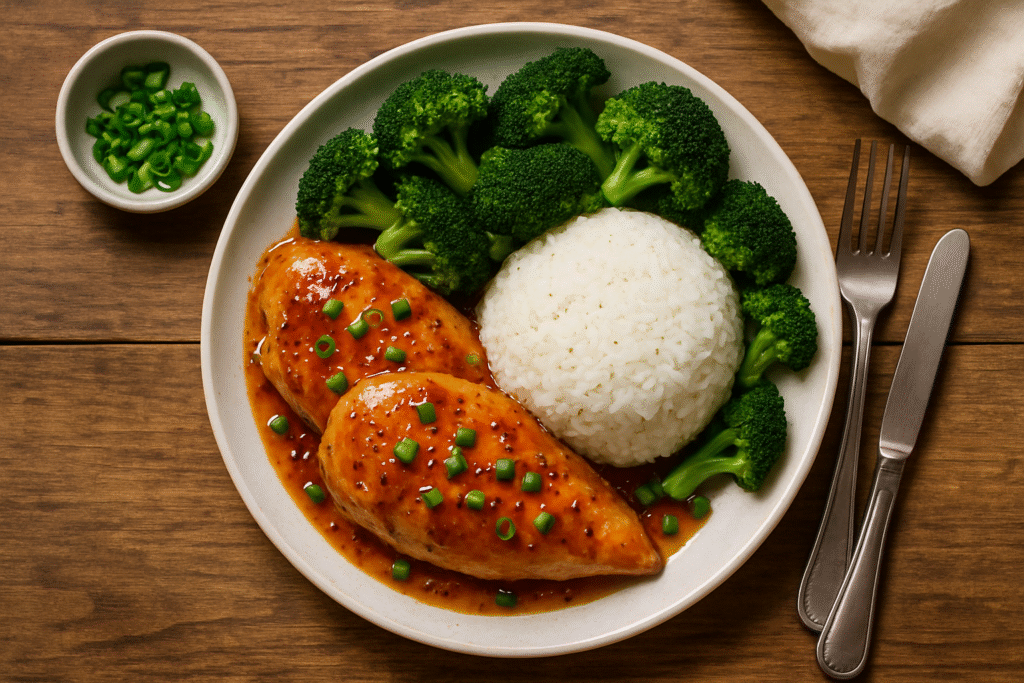
- Classic Comfort: Serve over a bed of fluffy jasmine or brown rice with a side of steamed broccoli. The rice and broccoli are perfect vehicles for soaking up every last drop of that incredible sauce.
- Low-Carb & Healthy: For a lighter meal, pair the chicken with cauliflower rice and some vibrant roasted asparagus or simple garlic green beans.
- Satisfying Noodle Bowls: Toss the chicken and sauce with cooked udon, ramen, or soba noodles for a deeply satisfying bowl that feels like a hug.
- Meal Prep Powerhouse: This recipe is fantastic for meal prep. Portion the cooked chicken into airtight containers with a side of quinoa and roasted vegetables for delicious, grab-and-go lunches throughout the week.
Storing INSTRUCTIONS:
Leftovers are fantastic, and this dish reheats wonderfully. Here’s how to store it properly to maintain its deliciousness.
- Refrigeration: Store any leftover honey garlic chicken in an airtight container in the refrigerator for up to 4 days. The sauce will keep the chicken moist and flavorful.
- Freezing: You can freeze the cooked chicken for up to 3 months. Place it in a freezer-safe container or zip-top bag. For best results, thaw it overnight in the refrigerator before reheating.
- The Best Way to Reheat: While you can use a microwave, the best method is to gently reheat the chicken in a skillet over medium-low heat with a splash of water or chicken broth to loosen the sauce. For an even better result that brings back some of the texture, reheat in an air fryer at 350°F for 5-6 minutes until warmed through.
Conclusion: Your New Go-To Weeknight Recipe
You now hold the secrets to a dish that definitively proves you don’t need to choose between fast, affordable, healthy, and delicious. This Honey Garlic Chicken Breasts recipe is more than just a meal; it’s a strategy for reclaiming your weeknights with a dinner that tastes like a special occasion but comes together with minimal effort. The balance of the sticky, savory-sweet sauce and the perfectly juicy, golden-seared chicken is a combination you’ll crave again and again.
We are confident this is the best honey garlic chicken recipe you’ll ever make! If you try it, please come back and leave a comment and a star rating below.
Best Honey Garlic Chicken Breasts
Ingredients
Method
- Prep the Chicken: Slice the chicken breasts in half horizontally to create thinner cutlets. Pat the chicken completely dry with paper towels. In a shallow dish, combine the flour, salt, pepper, and garlic powder. Lightly dredge each chicken cutlet in the flour mixture, shaking off any excess.
- Sear the Chicken: Heat the olive oil and butter in a large skillet over medium-high heat. Once the pan is hot, add the chicken in a single layer (work in batches if necessary to avoid overcrowding). Sear for 4-5 minutes per side without moving it, until a deep golden-brown crust forms and the chicken is cooked through. Remove the chicken to a plate and set aside.
- Make the Sauce: Turn the heat down to medium-low. Add the minced garlic to the skillet and cook for 30-60 seconds until fragrant, being careful not to let it burn.
- Create the Glaze: In a small bowl, whisk together the honey, soy sauce, and rice vinegar. Pour this mixture into the skillet, scraping up any browned bits from the bottom. In a separate small bowl, whisk the cornstarch and cold water together to create a smooth slurry. Pour the slurry into the simmering sauce, stirring constantly. Continue to stir until the sauce thickens into a glossy glaze, about 1-2 minutes.
- Combine and Serve: Turn off the heat. Return the seared chicken and any accumulated juices back to the skillet. Gently toss the chicken in the sauce until every piece is generously coated. Garnish with sliced green onions and sesame seeds, and serve immediately.
Notes
- Gluten-Free Option: To make this recipe gluten-free, use tamari instead of soy sauce and ensure you use cornstarch (which is naturally gluten-free) instead of flour for dredging the chicken.
- Using Chicken Thighs: This recipe works wonderfully with boneless, skinless chicken thighs. Cook times will be similar, but always ensure the internal temperature reaches 165°F (74°C).
- Storage: Store leftovers in an airtight container in the refrigerator for up to 4 days.
- Reheating: For best results, reheat gently in a skillet over low heat with a splash of water to loosen the sauce. Alternatively, an air fryer at 350°F (175°C) for 5-6 minutes works well to crisp it back up slightly.
Frequently Asked Questions (FAQs)
Can I make this recipe gluten-free?
Absolutely! To make this dish gluten-free, simply make two swaps. First, use a gluten-free tamari or coconut aminos instead of soy sauce. Second, coat the chicken in cornstarch instead of all-purpose flour before searing. The results will be just as delicious.
Can I use chicken thighs instead of breasts?
Yes, and they are fantastic in this recipe! Boneless, skinless chicken thighs are naturally juicier and very forgiving. The cooking time will be very similar. Just ensure they are cooked to an internal temperature of 165°F.
My sauce isn’t getting thick and sticky. What did I do wrong?
You didn’t do anything wrong, and this is an easy fix! The most reliable way to thicken the sauce is with the cornstarch slurry mentioned in Secret #3. If your sauce is still too thin after simmering, simply whisk 1 tablespoon of cornstarch with 2 tablespoons of cold water, then stir it into the simmering sauce. It will thicken up beautifully in less than a minute.
Can I make this in an air fryer or slow cooker? Yes, this recipe is very adaptable!
For the Air Fryer: Coat and cook the chicken pieces at 375°F for about 15-20 minutes, flipping halfway, until golden and cooked through. Prepare the sauce in a pan on the stovetop as directed, then toss the cooked chicken in the finished sauce.
For the Slow Cooker: Place the raw chicken breasts in the slow cooker. Whisk all sauce ingredients (except the cornstarch slurry) and pour over the chicken. Cook on LOW for 4-6 hours or HIGH for 2-3 hours. Remove the chicken, then whisk the cornstarch slurry into the sauce in the slow cooker and cook on HIGH until it thickens. Return the chicken (shredded or whole) to the sauce and toss to coat.
What’s the best type of honey to use for the sauce?
A standard, clear liquid honey like clover, wildflower, or orange blossom is your best bet. These have a balanced sweetness that complements the other ingredients. It’s best to avoid strongly flavored honeys (like buckwheat) or creamed honey, as their intense flavors or texture can overpower the delicate balance of the sauce.
Did You Love Our Recipe?
There are no reviews yet. Be the first one to write one.